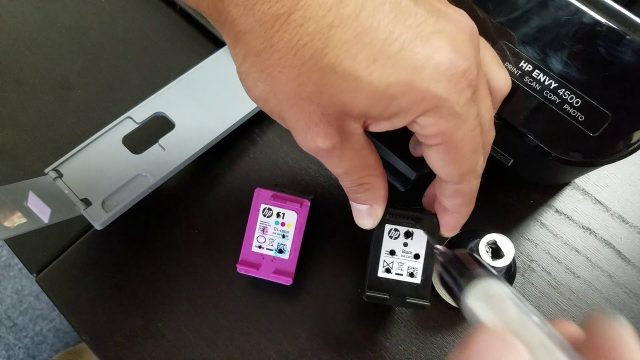
Obviously, HP Printer Cartridges are surprisingly costly. As an alternative, you can get it refilled at a store. The cheapest and effective alternative though is to refill it yourself. All it takes is a bottle of printer-ink and a syringe.
These days, ink manufacturers now produce some printers that come with ink tanks you’re supposed to refill yourself. Such models include the Epson Ecotank and Canon Megatank range. While their ink costs can work out well in the long run, these printers tend to be pricier to buy initially.
Our steps below, however, are for refilling regular ink cartridges. This can work out as a far better value than replacing the cartridges with new sets.
Step-by-step: How To Refill Your Ink Cartridges
1. Prepare your work area
If you’ve ever had to put an ink-stained garment through the washing machine you’ll know how stubborn the stains can be. Ink can do the same thing to a table so don’t refill your ink on your antique furniture.
Wherever you’ve decided to do the refilling, put some paper towels down to absorb any spills, pop on some plastic gloves, and don’t wear your Sunday best.
2. Make a hole in your cartridge
Most cartridges keep their ink in small reservoirs inside the plastic shell. To gain access you need to make a small hole at the top of the cartridge – the top side will have a sticky label on it. Peel the sticker back and make a small hole in the top half of the revealed surface with the drill bit that comes with your kit.
You may find some cartridges, HP ones in particular, already have a hole in them, in which case you don’t need to make another one. Refer to the video to see which hole to use.
3. Inject your ink
Once you’ve made your opening it’s time to inject some ink. Before you start playing doctor with your plastic patient, make sure your hole is in the right place – if your syringe moves freely or you can suck out some ink you’re in the right spot. Some cartridges hold the ink in sponges, in which case you’ll feel some slight resistance when you wiggle your syringe.
Next, take some ink from the bottle and inject it slowly into the cartridge. If at any point you see the ink start to bubble out of the hole the cartridge is either full or has some air in it.
To check, remove some of the contents from the cartridge – if there’s air in what comes out you know you need to add more ink. Otherwise, congratulations, your cartridge is full.
4. Plug the hole
Some kits come with plastic stoppers that fit neatly into the hole you’ve made, but you can also cover the hole with tape. It’s not essential to plug the hole since most cartridges sit in the printer with the label side facing up – just be careful not to turn it upside down.
5. Clean the print-head and try it out
The printer head is where the ink meets the paper and if it isn’t clean your prints will look smudged and uneven. To check it’s clean dab the printer head with a cloth and make sure the mark the head leaves is a neat rectangle.
To make doubly sure everything is well with your printer, print a test page. If you can see smudging or blots of ink remove your cartridge and wipe the head again. You may also need to draw out some of the ink if it’s too full.
Don’t worry about overfilling since you can always put the excess back in the bottle.
How To Refill Hp 63 Or 123 Cartridge
Using a needle, you have to run it across the top of the cartridge on the manufacturer’s label and locate refill holes. Once you locate the refill holes (see diagram below), carefully pierce through the label. Please try to locate the holes WITHOUT REMOVING the manufacturer’s label, as it is much easier to refill.
Attach the needle to the syringe and load the syringe with the correct color ink. You cannot overfill the regular cartridges. They have different configurations inside. Rather, insert the needle into the correct refill hole. You should feel the sponge. Press down on the sponge and start injecting ink.
Then SLOWLY inject the ink into the cartridge. Stop if the ink begins to well up from the fill hole. Clean off the top of the cartridge. Place a piece of Scotch transparent tape on the hole (optional).
Reinstall in the printer and run one or two cleaning cycles until the cartridge begins to print correctly. Do not exceed three cleaning cycles. If the cartridge is not printing correctly, the refill process may introduce air bubbles on the bottom of the cartridge. Let the cartridge sit in the printer overnight and the bubbles will be gone.
The printer may complain about “low ink” or “ink depleted.” You can hit “OK” or “Yes” to dismiss those warnings and keep printing. The printer will not track the ink level after refill. Keep an eye on the print quality. Refill as needed.
Above all, if the error message is “cartridge cannot be found”, “cartridge must be replaced,” take the cartridge out. Clean the contact ribbon and re-insert the cartridge. If the error won’t go away, the cartridge is damaged and needs to be replaced.
Note, some color ink refill kits are universal, meaning they are intended to work for all inkjet printer brands. Others are manufacturer or model-specific.
After refilling, if necessary leave cartridge in printer for up to 8 hours. The cartridge will print just like a new one. Even though the cartridge prints good, the ink level gauge will not read full after a refill. To reset the ink level gauge back to full follow these instructions:
This will allow you to reset the ID system & Ink Level Indicator built into the printer.
RESETTING
- Remove the cartridge from your printer.
- Place a piece of tape over the top left contact as shown in red on the picture to the right.
- With the tape covering the contact place cartridge back into the printer.
- The printer will perform and alignment page.
- Once an alignment page has been printed remove the cartridge from the printer.
- Place a piece of tape over the second contact shown in blue.
- Place cartridge into printer with both pieces of tape. (One covering the first contact and one cover the second contact.)
- The printer will print another alignment page.
- Once the second alignment page has been printed remove the cartridge from the printer.
- Remove tape pieces from cartridge contacts (Make sure there is no residual adhesive on cartridge contacts.)
- Place cartridge into the printer. The cartridge should now read full.
Most printer companies advise against refilling your own printer ink. Instead, they recommend that you purchase new cartridges from them directly. Refilling your own cartridges may void your ability to receive tech support from the printer manufacturer, so refill at your own risk.


